Employee Training
Employee Training consists of teaching the employees how to view their schedule and check their employee sales. Additional training can be done, but most of the time the employee does not want to become a receptionist, they want to know the minimal amount of information to complete their job successfully.
Learning to Use the Appointment Book Screen
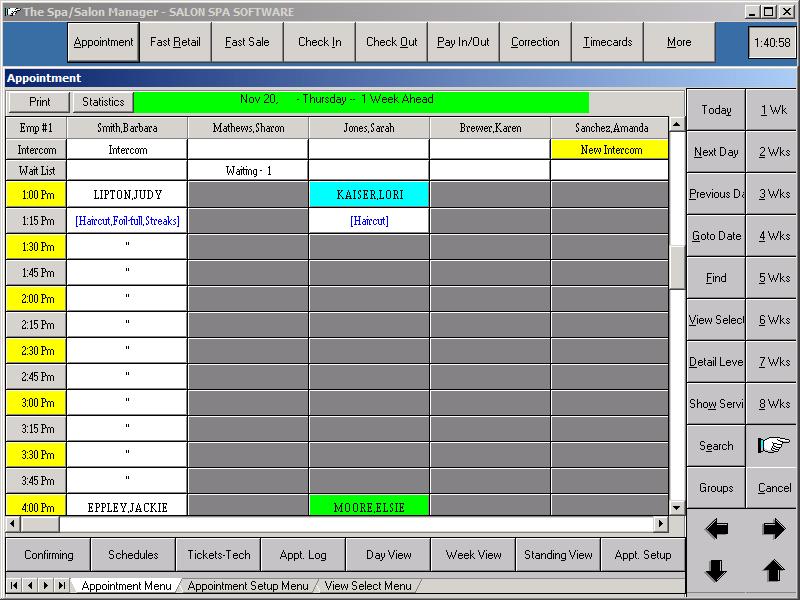
Let’s start by learning the appointment book. The appointment book shows the date in the center of the screen with the day highlighted in different colors depending on the date shown. If the date is shown in yellow you are booking on the current day. If in gray, (no background color) you are within the current week. Green shows you are at least one week ahead of the current day. If you are multiple days ahead the system shows the day with X Weeks ahead.
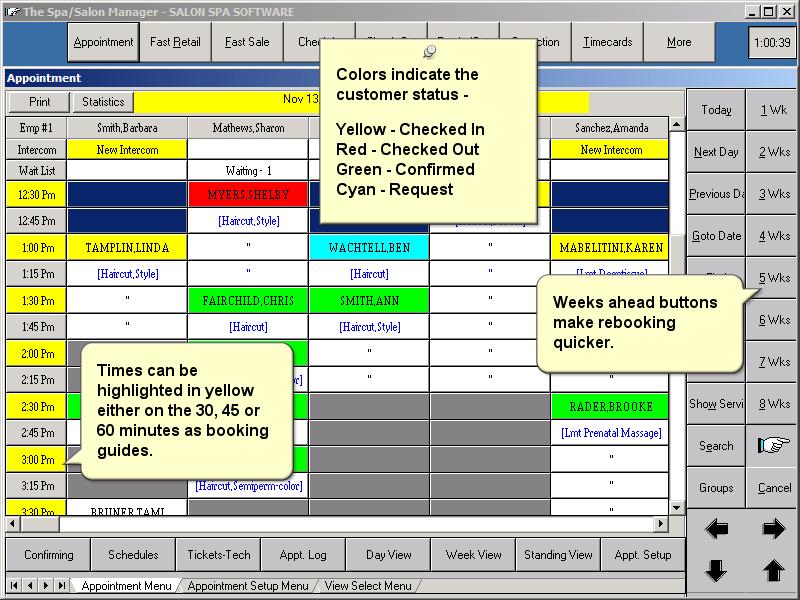
On the right side of the screen you have the fast access keys. These keys allow you to touch the key to perform a function or type the underlined letter on the keyboard.
| Today | Moves the appointment book to today’s date. |
| Next Day | Moves to the next day on the appointment book. |
| Previous Day | Moves to the day before today. |
| Go to Date | Used for the Franklin Planner people that know exactly the date and time they want. |
| Find | Used for the client that can’t remember when their appointment was made. Shows the date, time, employee and services scheduled. |
| View Select | Allows you to view particular employees on the screen. Can be used to show two people side by side for multiple bookings. |
| Show Service | Allows you to show a second column beside the employee to show the services to be performed. This information can be found by clicking or touching the client’s name in the appointment book. |
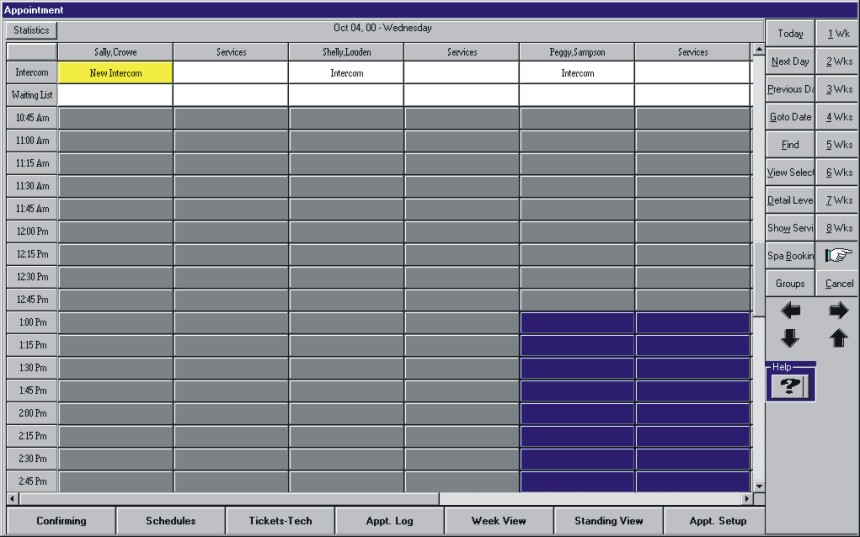
| Week View | Allows for one employee's schedule to be shown for the whole week. Appointments can be booked from this screen. |
| Weeks Ahead | 1 Wk through 8 Wks moves the appointment book the specified number of weeks. The hand located just below the 8 Wks indicates the direction that the calendar will move. When the hand is pointing right the calendar moves ahead in the book. Pressing the hand turns it to the left and the appointment date will go in reverse. |
Items in bold are essential in learning how to move around in the appointment book and to be able to book the desired employee.
To View your Schedule
After selecting the Appointment Book, click the View Select button on the right side. Click on your employee name and click Continue. Your schedule is shown on the screen. To change the date being viewed, use the buttons described above to either select Today, Next Day, Previous Day or Goto Date.
Booking an Appointment
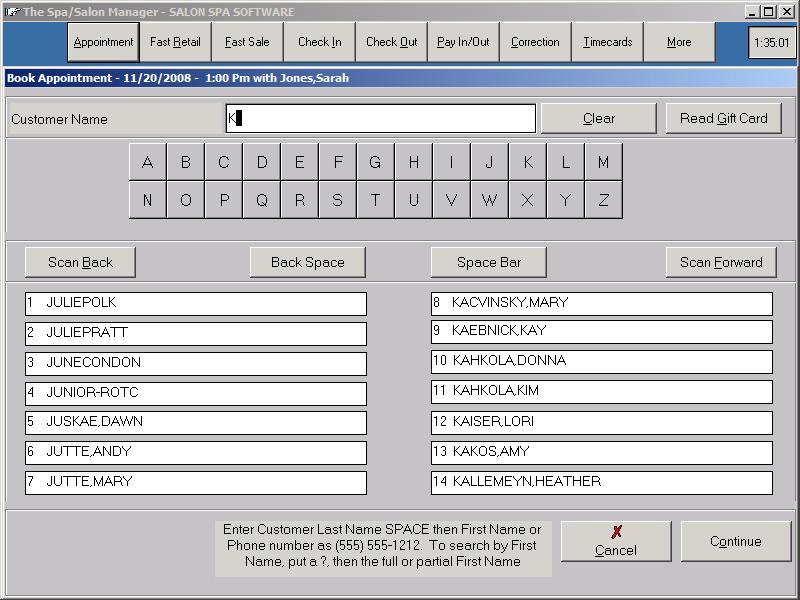
Booking an appointment is accomplished in a few steps. First click the block under the correct employee and the desired time. Gray blocks are where the employee is working and is not booked. Once you have clicked or touched the desired spot, the Customer Check In screen is displayed. Type the customer's name in with the last name followed by the first. If the system does not recognize the name typed, near spellings will be shown on the screen. After checking to make sure the name is not in the near spelling list, you can continue to add the customer's name to the computer. If you see the name at the bottom of the screen, click the name and the system will continue with the correct spelling.
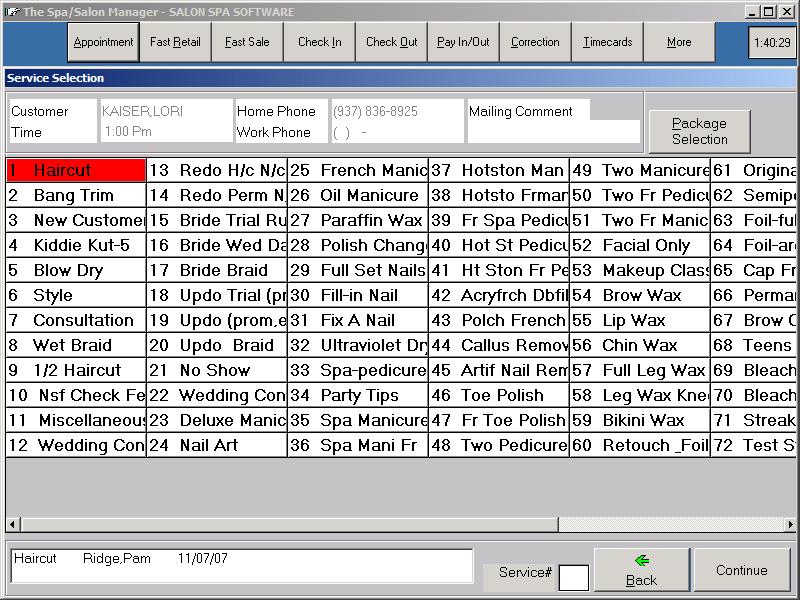
Services are selected by clicking on the desired service. The sample screen shows two services selected, H/C Women and Shampoo Set. The services are selected like a light switch. Clicking once turns them on and clicking again turns the service off. Once you have selected the correct service click Continue to continue.
The Booking Style screen shows the amount of time to be booked for the services selected and the particular employee. The time can be adjusted by pressing the +/- key using the mouse or you can type the time in the book out time. To book an appointment for a Perm for example, 30-30-30 which would book out 30 minutes, the next 30 minutes would be available for the next client, and the next 30 minutes would be to finish the original customer.
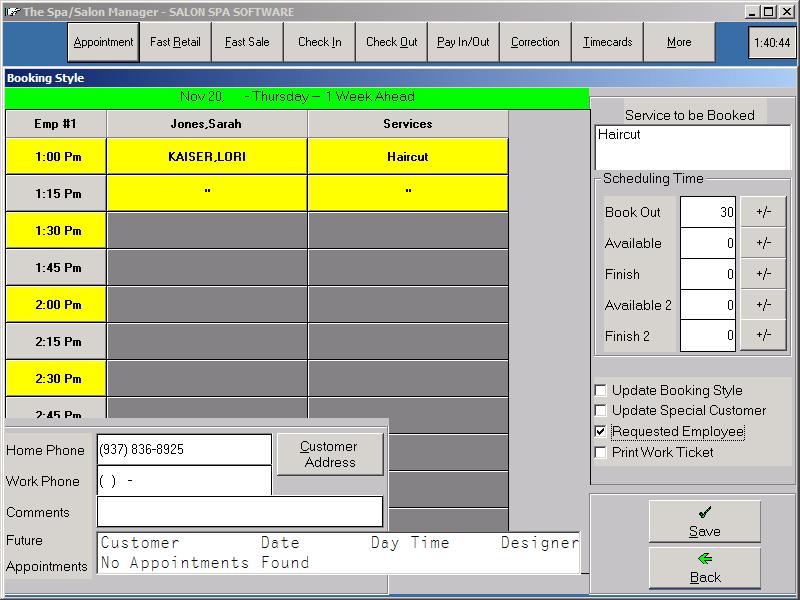
Double check the clients phone number with the customer. If any comments are needed that would be helpful to the employee, type them on the comment line. The comment line can be printed on the employees schedule, therefore the comment should be appropriate. If you need to re-select the services press the back button and the service selection screen will come back.
Once all that information is confirmed, press Save and the appointment is saved.
Intercoms
Below your name on the schedule, the system shows the word Intercom if someone has left you a message. Intercoms are viewed by clicking on the word, Intercom, below your employee name. Once the Intercom is clicked the system shows a list of all messages showing the intercom message #, date, time and sender. To view the contents of the message, click anywhere on the message line. Once you have viewed the message, it can either be printed by pressing the Print button or Deleted with the Delete button. If the message requires a response to the Sender, pressing the Reply to Sender button allows you to type a message back to the person that sent the message.
Paging
If your company has the ability to send email through the program then you can set up the system to send text messages to your cell phone when your customers check in and when same-day appointments are booked and/or cancelled. You can also receive messages when someone sends you an intercom message within the program. To start receiving text messages you would click the Paging button along the top of the screen, click Assign Pager, pick your name, and then fill in your cell phone number, carrier, and check the box to enable the text messaging.
Waiting List
The Waiting List is displayed below the employee name. To access the Waiting List click under the employee name. The Waiting List information is displayed showing the customer's name along with their phone numbers and the customer's availability. If an appointment cancels where a customer on your waiting list can be filled, the system automatically reminds the receptionist to fill this opening.
Employee Sales
Click Reports followed by Employee Sales.
The Employee Sales report lists all sales for the employee during the pay period listing the customer name with service and retail totals. The system allows for the employee to review last period sales along with past periods. Once the report is shown on the screen, the arrows at the top allow you to change to the next page.
Employee Daily Totals
The Employee Daily Totals report lists only totals for Service and Retail by date with a comparison to the last period showing the percentage increase or decrease.
Click on the buttons below to continue this tutorial.