Learning to Use the Appointment Book Screen
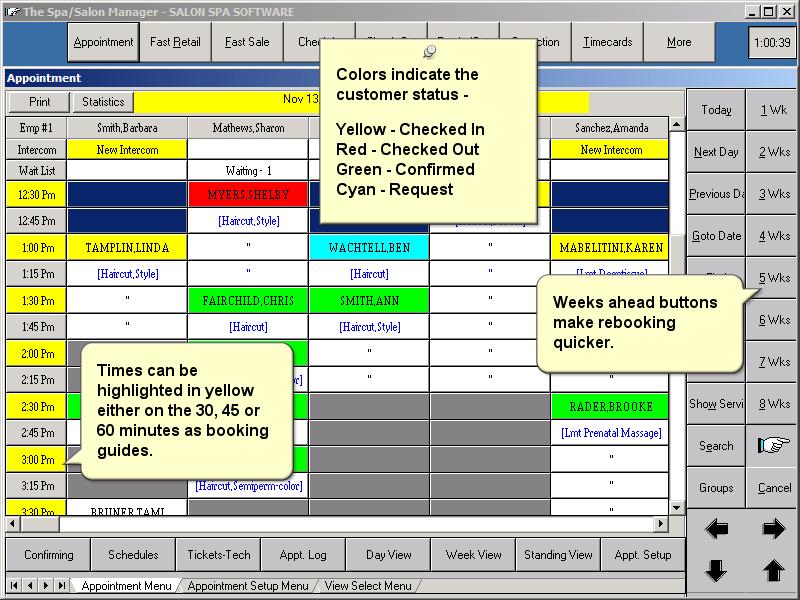
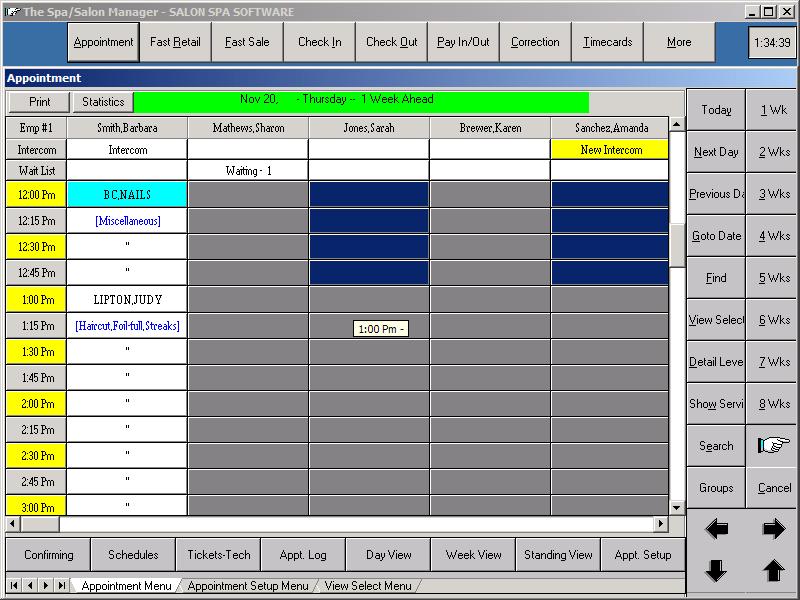
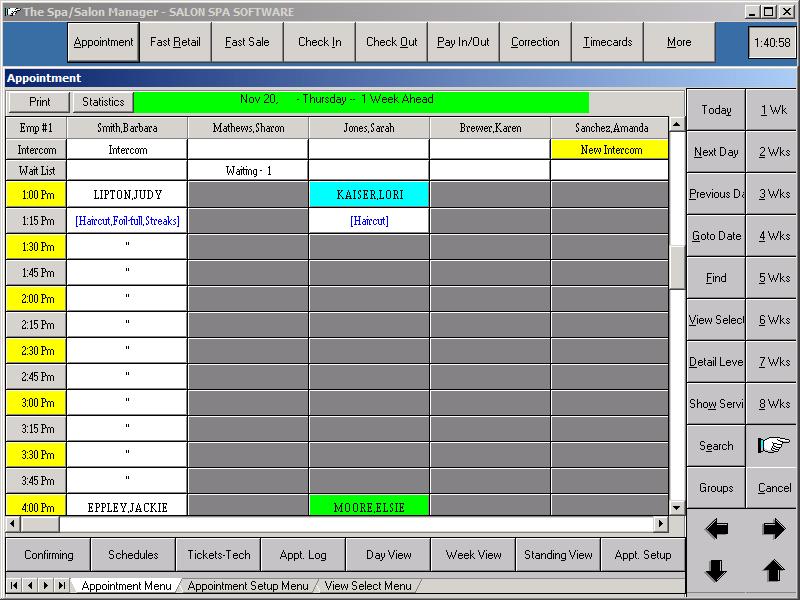
We will start by learning the appointment book. The appointment book shows the date in the center of the screen with the day highlighted in different colors depending on the date shown. If the date is shown in yellow, you are booking on the current day. If in gray, no background color you are within the current week. Green shows you are least one week ahead of the current day. If you are multiple days ahead, the system shows the day with X Weeks ahead.
On the right and bottom of the screen you have the fast access keys. These keys allow you to touch the key to perform a function or type the underlined letter on the keyboard.
| Today | Moves the appointment book to today’s date. |
| Next Day | Moves to the next day on the appointment book. |
| Previous Day | Moves to the day before today. |
| Go to Date | Used for the Franklin Planner people that know exactly the date and time they want. |
| Find | Used for the client that can’t
remember when their appointment was made. Shows the date, time,
employee and services scheduled.
To
change months click on the scroll bar on the right side of the
calendar. Once the date
is found click it followed by Continue. |
| View Select | Allows you to view particular employees on the screen. Can be used to show two people side by side for multiple bookings. |
| Detail Level | The Detail Level allows for the number of employees shown on the book to be changed. Setting the width to a smaller number shows more employees on the screen with narrow columns. The Height changes how many hours the appointment book shows at one time. The Appointment Size changes the size of the text in the appointment screen allowing for either very small or larger print which can be set to aid an an employee having trouble reading the screen. The settings on the Detail Level are saved per computer, changing these settings do not affect other screens. |
| Show Service | Allows you to show a second column beside the employee to show the services to be performed. This information can be found by clicking or touching the client’s name in the appointment book. |
| Search | Allows the computer to search for an individual open or a whole package of services. Can look for a specific employee or any available. |
| Day View | Allows the computer to show a view of the appointment book that is similar to the Greeting Schedule report. For all of the employees currently shown on the screen, it will show you what customers are coming in at what times. It also shows you what employee they are seeing, what services they are having done, and shows an 'i' at the start of the line to show all customers that are checked in, and an 'o' at the start of the line to show all customers who have been checked out. Any of these customer names can be clicked on just as you could click on an appointment in the appointment book, which will take you to the appointment detail screen. |
| Week View | Allows for one employee schedule to be shown for the whole week. Appointments can be booked from this screen. |
| Weeks Ahead | 1 Wk through 8 Wks moves the appointment book the specified number of weeks. The hand located just below the 8 Wks indicates the direction that the calendar will move. When the hand is pointing right the calendar moves ahead in the book. Pressing the hand turns it to the left and the appointment date will go in reverse. |
| Statistics | Shows the total number of
appointments for the day in the left corner of the appointment book
and the number of packages in the right hand
corner.
Clicking
on the Package Count in the right hand top corner shows the packages
booked sorted by customer name, time of appointment and the services
to be performed. A print button is available to allow the packages
to be printed if a copy is needed at the front desk. |
| Group Booking | Group booking allows a group of customers to be scheduled. When scheduling a group we recommend using the name of the customer responsible for the group. The computer will book the appointments with that customers name with an ^1 for the first customer and ^2 for the second an so fourth. You do not have to determine the customers names that are actually receiving the services until you check them out or you can check them out as a group. |
Items in bold are essential in learning how to move around in the appointment book and to be able to book the desired employee.
| Yellow | The customer has been checked in. |
| Red | The customer has been checked in and out of the salon. (They are finished) |
| Green | Customer was confirmed through the appointment book or if booked within a specified number of days the appointment is marked "confirmed" automatically. |
| Pale Pink | Booking Guides showing the preferred starting time of an appointment. |
| Purple | Customer is Checked In, but has been checked in and out once before. |
| Teal | Customer was a request customer. Requests must be turned on for this color to display. |
| Light Blue | New customer appointment. |
| Red Square | A Red Square in the top right-hand corner of the appointment indicates the appointment has a comment associated with it. Moving the mouse on the appointment will show the appointment comment. This option may be turned on or off under Maintenance, Appointment. |
Booking an Appointment
Booking an appointment is accomplished in a few steps. First click the block under the correct employee and the desired time. Gray blocks are where the employee is working and is not booked.
Once you have clicked or touched the desired spot, the Customer Check In screen is displayed. Type the customer's name in with the last name followed by the first. If the system does not recognize the name typed, near spellings will be shown on the screen. After checking to make sure the name is not in the near spelling list, you can continue to add the customer's name to the computer. If you see the name at the bottom of the screen, click the name and the system will continue with the correct spelling.
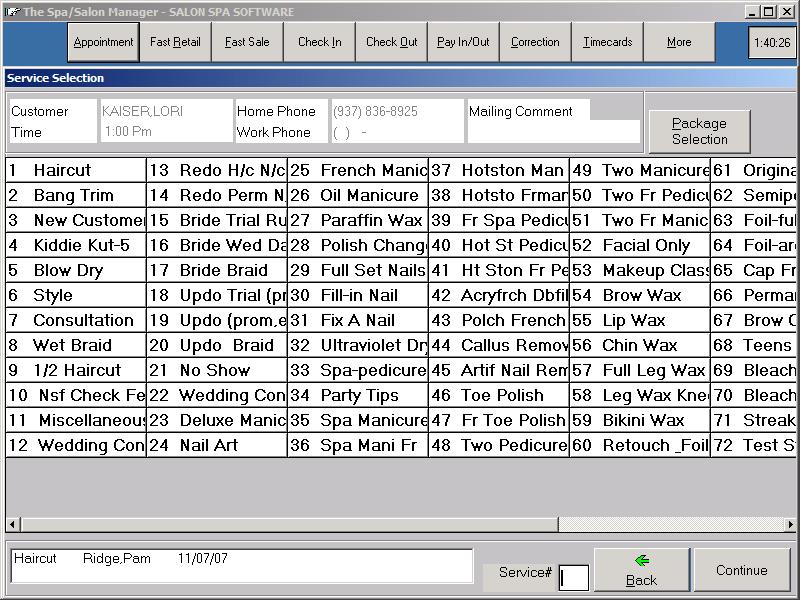
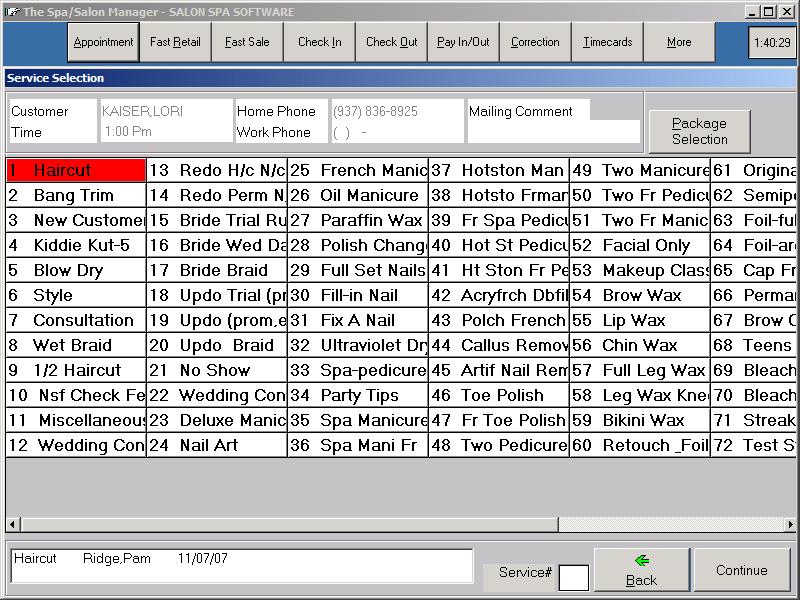
Services are selected by clicking on the desired service. The sample screen shows two services selected, H/C Women and Shampoo Set. The services are selected like a light switch. Clicking once turns them on and clicking again turns the service off. Once you have selected the correct service click Continue to continue.
The Booking Style screen shows the amount of time to be booked for the services selected and the particular employee. The time can be adjusted by pressing the +/- key using the mouse or you can type the time in the book out time. To book an appointment for a Style Shampoo Set for example, 30-30-30 which would book out 30 minutes, the next 30 minutes would be available for the next client, and the next 30 minutes would be to finish the original customer.
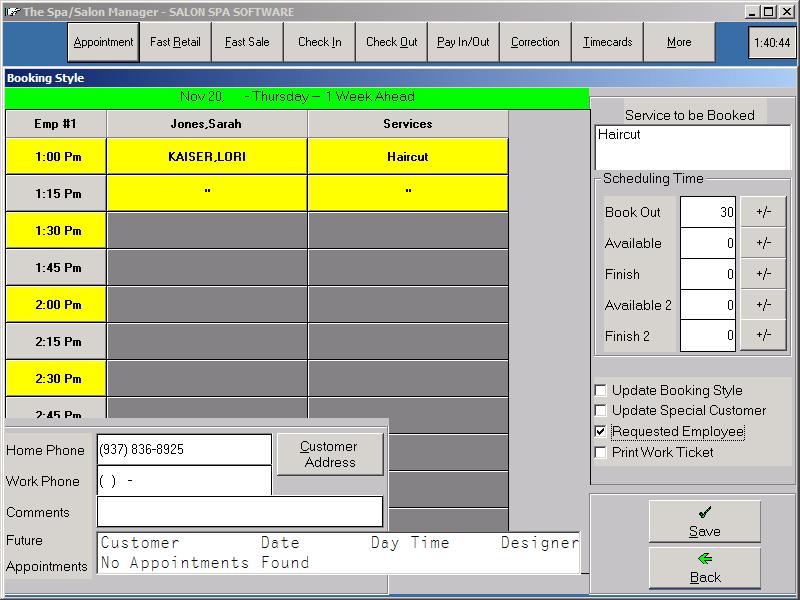
Double check the client's phone number with the customer. If any comments are needed that would be helpful to the employee, type them on the comment line. The comment line can be printed on the employee's schedule, therefore the comment should be appropriate. If you need to reselect the services, press the back button and the service selection screen will come back.
Once all that information is confirmed press Save and the appointment is saved.
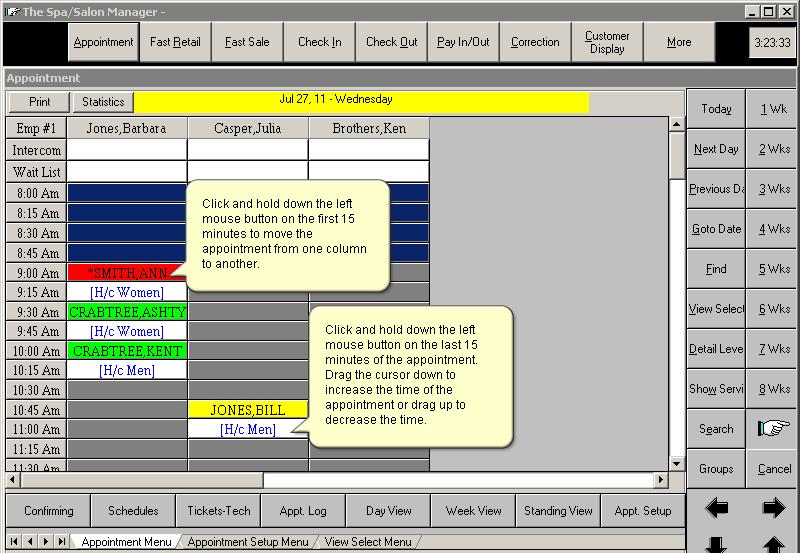
Adjusting an Appointment Timing or Changing Columns
Appointment Detail Screen
The Appointment Detail screen gives information about a customer's appointment as well as options such as Check In, Check Out, and Cancel Appointment. You can get to the Appointment Detail screen by clicking on a customer's appointment. In addition, all of the options on the Appointment Detail screen can be accessed by right-clicking on the customer's appointment.
Cancel Appointment
To cancel an appointment click on the customers name. At the bottom of the screen in the middle you will see a prompt that says Cancel Appt, click on that prompt. You can now cancel the Whole Appointment for that day, Cancel All appointments for that customer, or you can specify specific time slots to be cancelled. To remove specific time periods, put a check mark in front of the time to be removed. Once you have the times check marked click on Remove at the bottom right of the screen. This will remove only the times check marked. This is helpful when squeezing a customer in between other customers. Appointments can also be extended or shortened by dragging the last slot of the appointment to the desired ending time and can be moved by dragging the first slot of the appointment to the desired time.
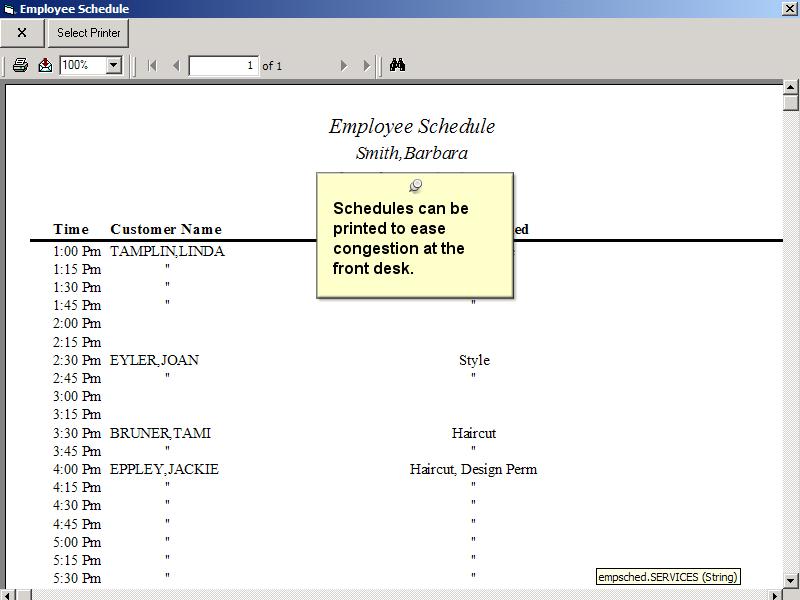
Printing Employee Schedules
Employee schedules are printed by clicking on the Appointment Book. Once the appointment book is displayed, click the Schedules button on the bottom of the screen.

Pick the correct day. Schedules should ALWAYS be printed the night before. You can not guarantee that the computer will be on when you come in first thing in the morning. It is better to have printed schedules than no schedules at all.
Printing Work Ticket - Tech.
Choose the correct report type for your salon, you may choose Work Tickets with Technical Cards, Work Tickets Only, or Technical Cards Only. The system automatically chooses the next day, which is the day that should be printed.
Confirming
Confirmation tracking is accomplished by either calling the customer or if the customer books the appointment for the next day the computer will mark the appointment confirmed automatically to avoid calling a customer who has just made an appointment. Click the Confirming button on the bottom of the screen. Click on the desired date to confirm and the starting employee. The system will prompt you with services to be performed along with the time and employee servicing the customer. If multiple services are being done the system shows those services to avoid calling the customer twice.
Standings
Standing appointments allows the computer to setup automatic scheduling of recurring appointments. The frequency of the appointment can be specified from one week to sixteen weeks.
Intercoms
The
Intercom feature provides a method to leave messages for an employee or all
employees to avoid those sticky yellow notes that get lost and are never found.
Key benefits allow you to send a message to all employees regarding a staff
meeting or a personal message to let someone know a family member left a
message. To send an Intercom click on the Intercom button on the top left side
of the appointment book. To read your Intercoms, click at the top of the
appointment column under your employee name.
Waiting List
The Waiting List allows you to enter specific information concerning a customer that wants to schedule an appointment in the event that another customer cancels an appointment. The Waiting Lists prompts for the available times for the customer by day of week and the time of day either morning, afternoon or evening. If an appointment is cancelled, the system will prompt you that a person on the waiting list can be booked. If you have someone on your waiting list under the employee name on the appointment book a message will show Waiting - 2, this would signify that two people are on your waiting list. Clicking on the Waiting - 2 the computer prompts to show all customers on the Waiting List or to show only the customers that would qualify to come in on the day you are working. The Waiting List can be printed through Reports -> Appointment Reports -> Print Waiting List.
Schedule Maintenance
Schedule
Maintenance allows you to block off normally open time on the appointment book
for either a single employee or all employees for certain dates, extremely
useful for holidays or vacations.
Appointment Log
The Appointment
Log is the resource that allows you to see what happened on the appointment
book. The appointment log allows you to list all of the cancellations on a
particular day or the number of appointments that were made on a day and who
made them. The appointment log is a great tool to check on a new receptionist to
determine if the booking choices they made throughout the day were good ones.
When searching for appointments using the Appointment Log you should enter the smallest amount of information possible to find what you're looking for. In other words, if you want a list of all of the appointments that were booked or cancelled on March 7th 2006 you would fill in 03/07/2006 on the Date Appointment was Booked line for both the Starting and the Ending date and leave the rest of the lines blank. Just click Search and you would get a complete list of all of the changes from that day.
- Date Appointment was Booked - Shows only appointments that were booked/cancelled between the dates entered.
- Appointment Date - Shows only appointments on the book for the dates entered.
- Customer Name - Shows only appointments for the customer name entered.
- Employee who scheduled Appointment - Shows only appointments booked/cancelled by the selected employee. This option can also be used to search for all appointments booked online by selecting Web Booking as the employee.
- Scheduled Employee - Shows only appointments booked/cancelled on the selected employee's book.
- Type of Booking - Show only appointments booked, only appointments cancelled or only appointments that were changed.
- Services - Show only appointments for the selected service.
- Detailed Report/Summary Report - Detailed reports show each individual booking and cancellation - Summary reports just show the total number of bookings and cancellations.
- Sort Method - Determines whether the changes are sorted by date or by the employee that made the change.
- Include Standings - Answering No to this will make the report leave off any appointments that the system automatically booked because they were entered as a standing appointment.
Working Hours
Working hours are
defined for each employee for each day of the week. If the employee works with
an assistant an extra column beside their name is labeled as Assistant. This column
allows an employee to book two people at the same time one in their normal
column and another in the Assistant column. Note: Only put times in the
assistant column when the employee is working with an assistant.
Workticket
The Workticket prints a ticket for each scheduled appointment with the customer's scheduled appointments and times along with their service history. Any technical information required is printed on the workticket. Worktickets are generally used to keep a paper trail for the receptionist record the daily sales.
Spa Booking
The Spa Booking feature is used to book packages and search for available appointments. Clicking Spa
Bookings asks for the customer's name to be booked. A package can be chosen by
pressing the down arrow at the end of the package name, to search for services
not part of a package, click the desired services and any employee preferences.
Click Search and the computer will prompt with the first available
opening for the appointments desired.
Group Booking
The Group Booking is used to book groups of customers into the Salon or Spa. The system allows you to set the number of customers in the group along with the services desired by the group.
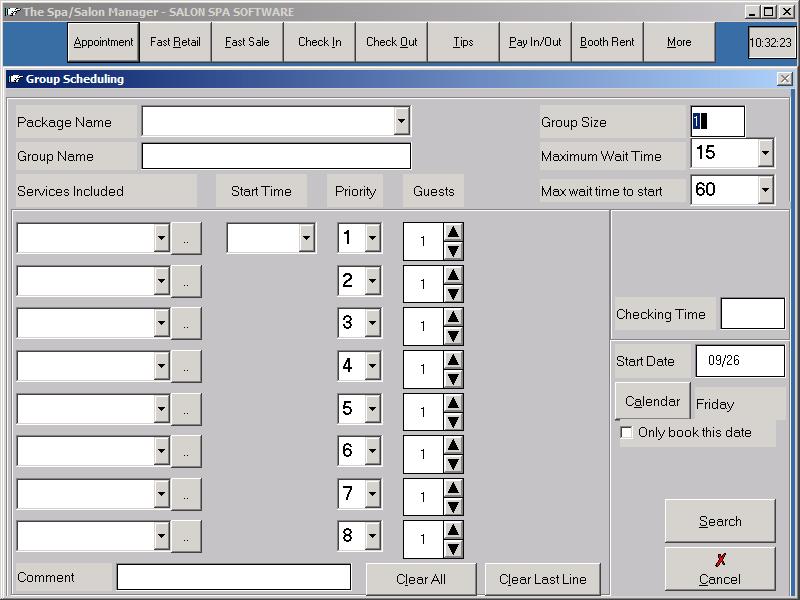
Max Wait Time - This is the maximum amount of time that the customer will have to wait between services.
Max Wait Time to Start - This is the maximum amount of time that the successive customers must wait before starting their services. Once the first customer is booked at 2:00 Pm and with a Max Wait Time to Start of 30 the system would not consider the appointment if the following group members could not be started by 2:30 PM. If the system is unable to book the group because of the Max wait time being too much, the system will let you know that changing this Max wait time 'may' allow the group to be scheduled.
Start Time - The Start Time is the earliest the group would like to have the appointments scheduled. Setting the Start Time avoids the computer from prompting for times before 5:00 PM when the group states that they need to be scheduled after 5:00 Pm.
Priority - The Priority feature allows services to be reversed, in order to make an appointment fit. When booking several appointments the computer may be able to schedule the customer in the group by reversing the order of the services if they have the same priority.
Guests - Number of customers that are receiving the particular service. Note, not all group members are required to have the same services.
Calendar - Used to show a pop-up calendar to allow the date to be clicked. This will be the starting date the computer searches for in the Group Booking.
Only Book this Date - If the Group only wants a specific date, this will prevent the computer wasting time searching undesired dates.
Click on the buttons below to continue this tutorial.